After publishing your first blog post as directed in Done For You Affiliate Marketing First Blog Post it is time for you to set up a lead capture page. Think about this like an advert which is designed to grab the attention of people interested in affiliate marketing. It will also provide you with a list of people to share your blog posts with as we progress.
To set up this lead capture page you will need an account with Leadsleap.
Click here to join Leadsleap for Free
Importing The Lead Capture Page
I have already created a lead capture page for you to use, and you just need to import it into your Leadsleap account. I have a blog post on this subject:
How To Import a Lead Capture Page Into Leadsleap
Or you can follow the instructions below:
Inside Leadsleap you need to click first on the PAGE MANAGER section of the main menu. Then click on ADD NEW and give it a name. I suggest you use the name “Affiliate System That Works”.
The FIRST page you will be importing looks like the image below. You will be importing more as you progress through this system so it is a good idea to name the pages as something that helps you know which one is which.

After creating the new page name, you then click on Add A New Page Design (or the + in the icon menu). This will ask if you want a blank page or to import one with a code. Use the code: page-abNtNGWVNV and click on import now.
Note that you will see an error message when you do this. It is because you do not have an email list yet. We will sort that out next.
Adding An Email List
This time you need to click on LIST MANAGER in the Leadsleap menu. You click on add new and add a name for your list. This time I suggest you use the name “Affiliate Marketing Success System”.
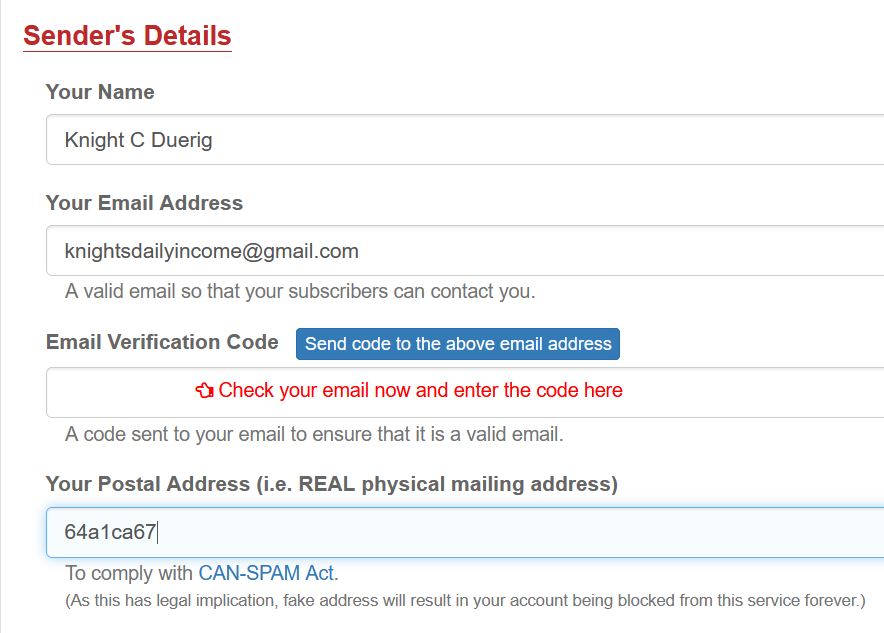
After creating the list you will have to activate it, and this requires filling in a form with your own details. You will also have to send a code to your email address to confirm you have access to it.
The form looks like this:

When you have completed the form, you can activate the list.
Connect Capture Page and Email List
Before you start promoting the lead capture page you must make sure that the page is connected to your email list. If not then the page will not collect email addresses for you.
To do this click on Page Manager again and then click on LAUNCH EDITOR button.
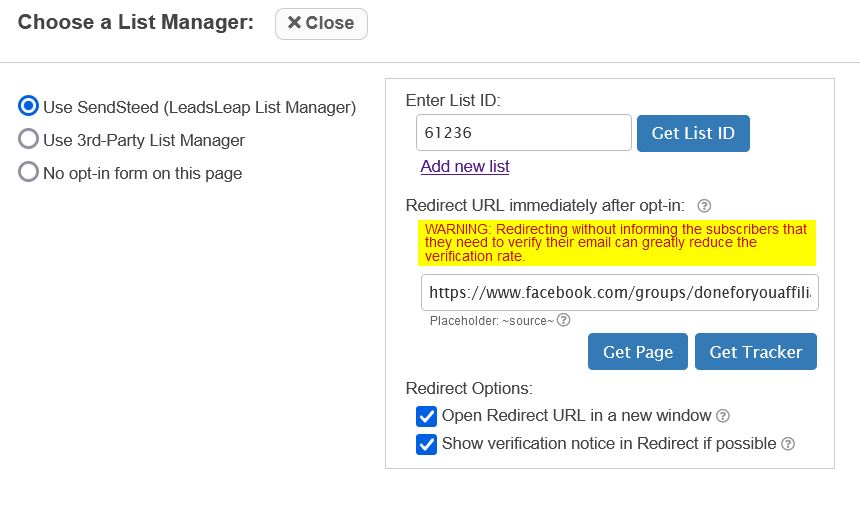
In this section you will see an extra menu to the side – the second item on that menu is LIST. Click on this and you will see the following page:

On this page click on the Get List ID button and choose your email list from the drop-down menu.
In the redirect box you should add a link to your first blog post. Click the boxes for open in new window and verification notice as shown above.
Remember to click on the green save button at the top right of the screen to complete the connection.
Your lead capture page is now ready to start promoting. However, you have not added any emails into the automated system yet. In my next blog post I will provide you with a welcome email to add into the system. This will start to build your relationship with your email subscribers.
Respectfully,
Knight C Duerig
(My friends call me K.C.)
Text 208-599-2638
Related posts:
Leave a Reply